
While this tutorial is free, it is not to be sold, nor are the products made from this tutorial to be sold. This is takes a lot of time to come up with, execute, and post.
Please give credit to @kawaii.nuimos on Instagram and refer people to this blog for the tutorial.
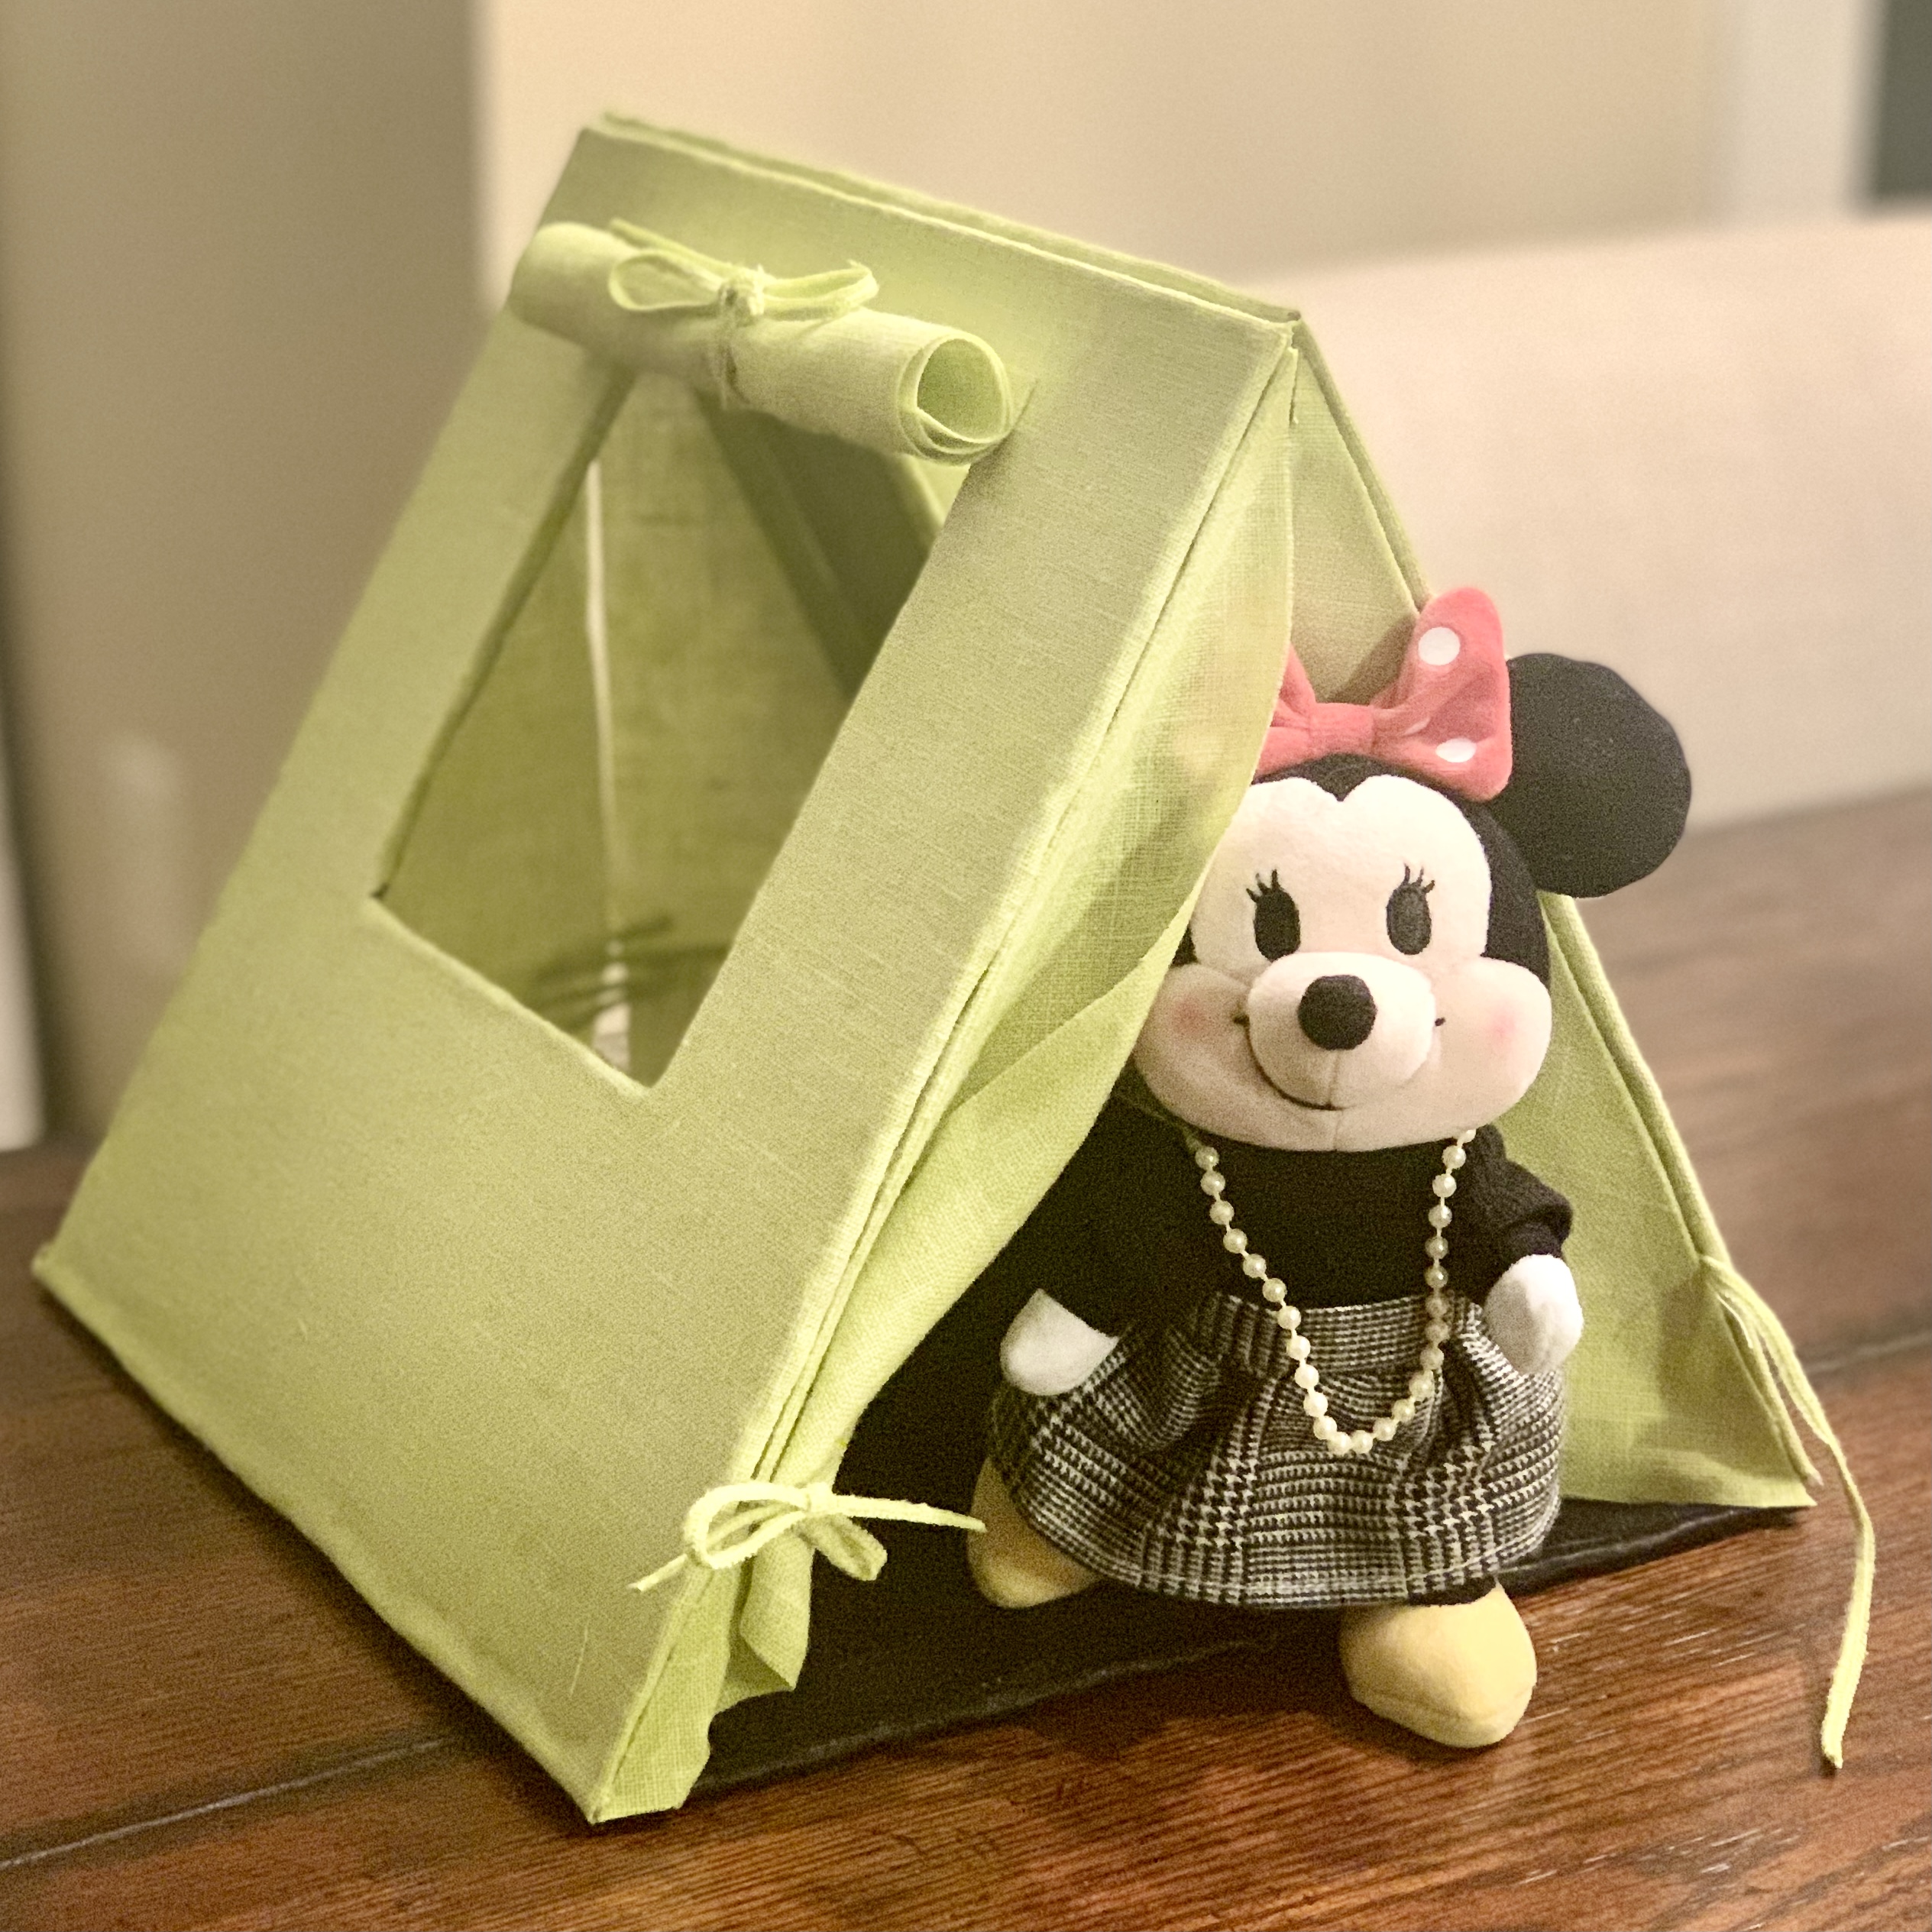
Foldable Tent for Two Tutorial for Disney nuiMOs
Materials:
* Clear Gel Tacky Glue - This is what makes this tutorial more beginner-friendly, by eliminating sewing.
* Fray Check - You are going to want this, trust me. It is what helps give this tent a more finished look, gives this tutorial less steps (which means more beginner friendly), and prevents sewing.
* Cardboard - I do not recommend chipboard/paperboard, etc. for this, because the use of glue can make this warp them, plus they are less sturdy for play. Cardboard is also much more accessible! The measurements are further down.
* Fabric - Test the fabric first with enough tacky glue that it comes through. If you are okay with the results once fully dry, then move forward with that fabric. Otherwise use another. Fabric that looks the same on both sides looks best, but is not necessary. I made the instructions to assume you are using single-sided fabric. I used 5 linen napkins I thrifted measuring 40 x 42 cm each for the walls. So at least enough for that amount in total (plus more if doing the floor in the same fabric). I used satin from a party table runner that was being throw out at a party I attended (if you are a crafter and you see fabric being thrown out, you need to save it! haha). Measurements in instructions.
* Ribbon - I used the sewn edge to the napkins as ties, but thin ribbon or something similar works. You need a total of at least 2.4 meters. Use fray check on any cut ends.
Tools:
* Something to mark the fabric and cardboard with - This is optional, and if using a hard edge as a cutting guide. Though I find it useful for marking measurements on the wrong side of fabric. Sometimes I like to use Pilot Fixion markers, pens, etc. as they wash off with water. This time I used a silver Sharpie as I was using black fabric, but made sure to mark immediately outside where I was to cut and cut inside the lines.
* Scissors or rotary cutter - For cutting fabric
* X-acto knife or utility knife - For cutting the cardboard. Trust me, cutting cardboard with scissors is not fun. I find a #1 blade for the x-acto knife to be sturdy, yet precise for this. I also used the x-acto knife to cut fabric at certain stages.
* Clothing iron - The fabric needs to be ironed both before and as an additional step.
* Cutting mat or extra cardboard - to cut on.
* Measuring tape, ruler, or quilter's ruler - For measuring, but the ruler or quilter's ruler really helps as a cutting guide.
* Flat brush that you can "paint" the glue on smooth with. I used my fingers, but this is not recommended. I had to wash my hands about 50 times every time I needed to do anything. It isn't worth it. Wash the brush every so often, as the glue dries. The glue is water-soluble, so it should wash clean and easily.
Instructions:
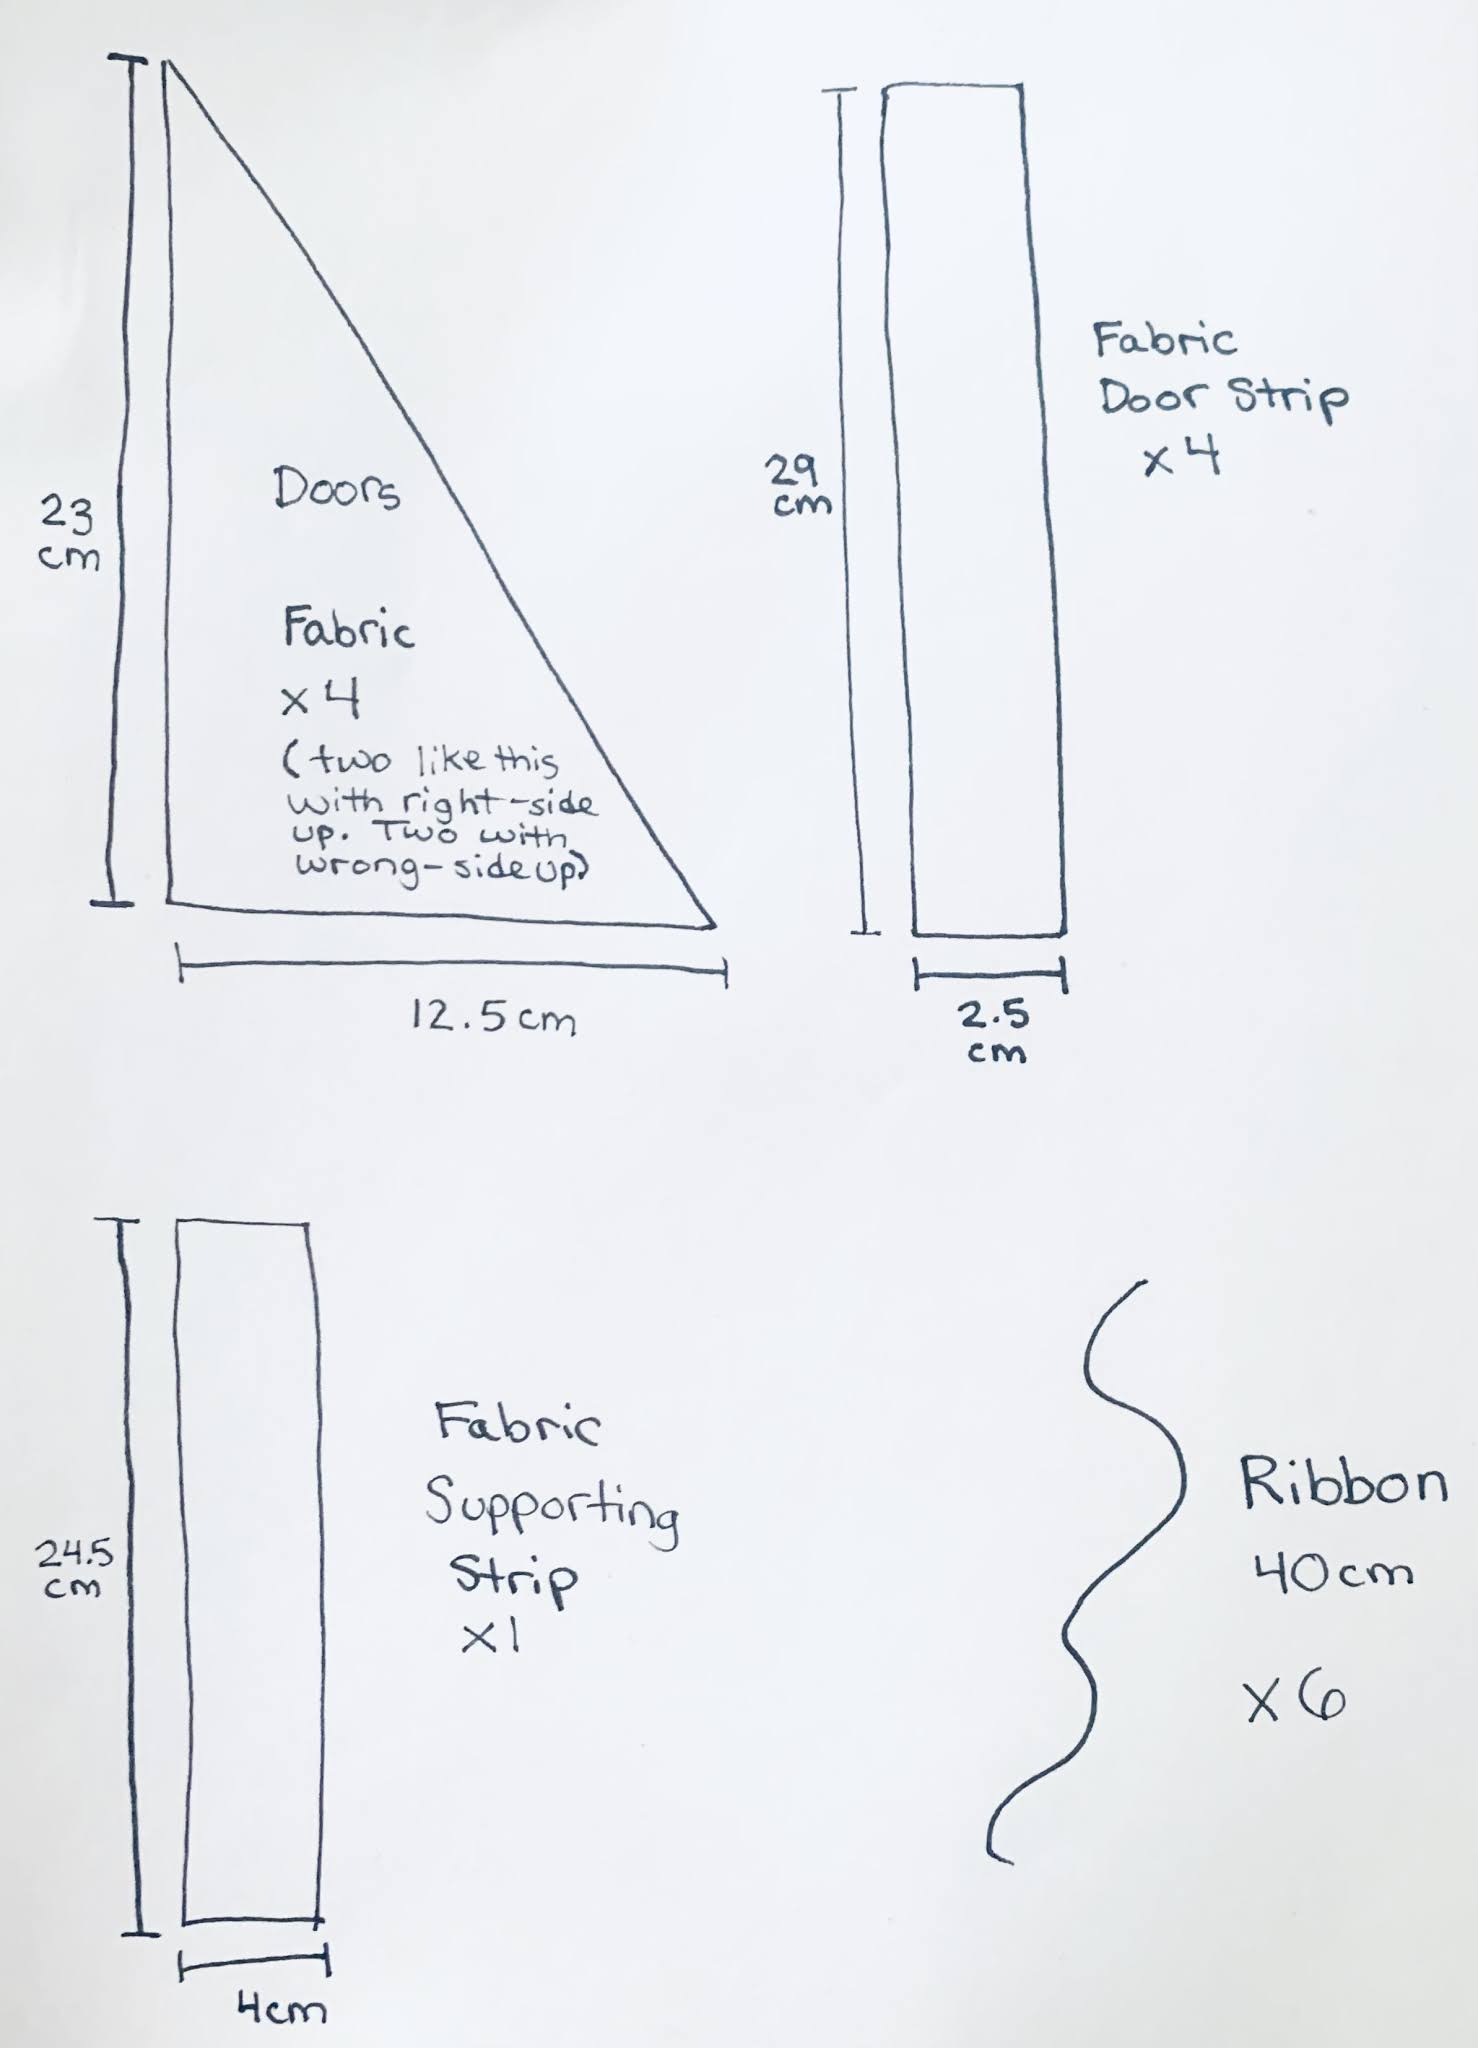
Step 1: Prepare cardboard pieces in the measurements shown. Prepare the fabric by ironing it. Cut some of the fabric to the measurements shown.
* Fray Check - You are going to want this, trust me. It is what helps give this tent a more finished look, gives this tutorial less steps (which means more beginner friendly), and prevents sewing.
* Cardboard - I do not recommend chipboard/paperboard, etc. for this, because the use of glue can make this warp them, plus they are less sturdy for play. Cardboard is also much more accessible! The measurements are further down.
* Fabric - Test the fabric first with enough tacky glue that it comes through. If you are okay with the results once fully dry, then move forward with that fabric. Otherwise use another. Fabric that looks the same on both sides looks best, but is not necessary. I made the instructions to assume you are using single-sided fabric. I used 5 linen napkins I thrifted measuring 40 x 42 cm each for the walls. So at least enough for that amount in total (plus more if doing the floor in the same fabric). I used satin from a party table runner that was being throw out at a party I attended (if you are a crafter and you see fabric being thrown out, you need to save it! haha). Measurements in instructions.
* Ribbon - I used the sewn edge to the napkins as ties, but thin ribbon or something similar works. You need a total of at least 2.4 meters. Use fray check on any cut ends.
Tools:
* Something to mark the fabric and cardboard with - This is optional, and if using a hard edge as a cutting guide. Though I find it useful for marking measurements on the wrong side of fabric. Sometimes I like to use Pilot Fixion markers, pens, etc. as they wash off with water. This time I used a silver Sharpie as I was using black fabric, but made sure to mark immediately outside where I was to cut and cut inside the lines.
* Scissors or rotary cutter - For cutting fabric
* X-acto knife or utility knife - For cutting the cardboard. Trust me, cutting cardboard with scissors is not fun. I find a #1 blade for the x-acto knife to be sturdy, yet precise for this. I also used the x-acto knife to cut fabric at certain stages.
* Clothing iron - The fabric needs to be ironed both before and as an additional step.
* Cutting mat or extra cardboard - to cut on.
* Measuring tape, ruler, or quilter's ruler - For measuring, but the ruler or quilter's ruler really helps as a cutting guide.
* Flat brush that you can "paint" the glue on smooth with. I used my fingers, but this is not recommended. I had to wash my hands about 50 times every time I needed to do anything. It isn't worth it. Wash the brush every so often, as the glue dries. The glue is water-soluble, so it should wash clean and easily.
Instructions:
Step 1: Prepare cardboard pieces in the measurements shown. Prepare the fabric by ironing it. Cut some of the fabric to the measurements shown.


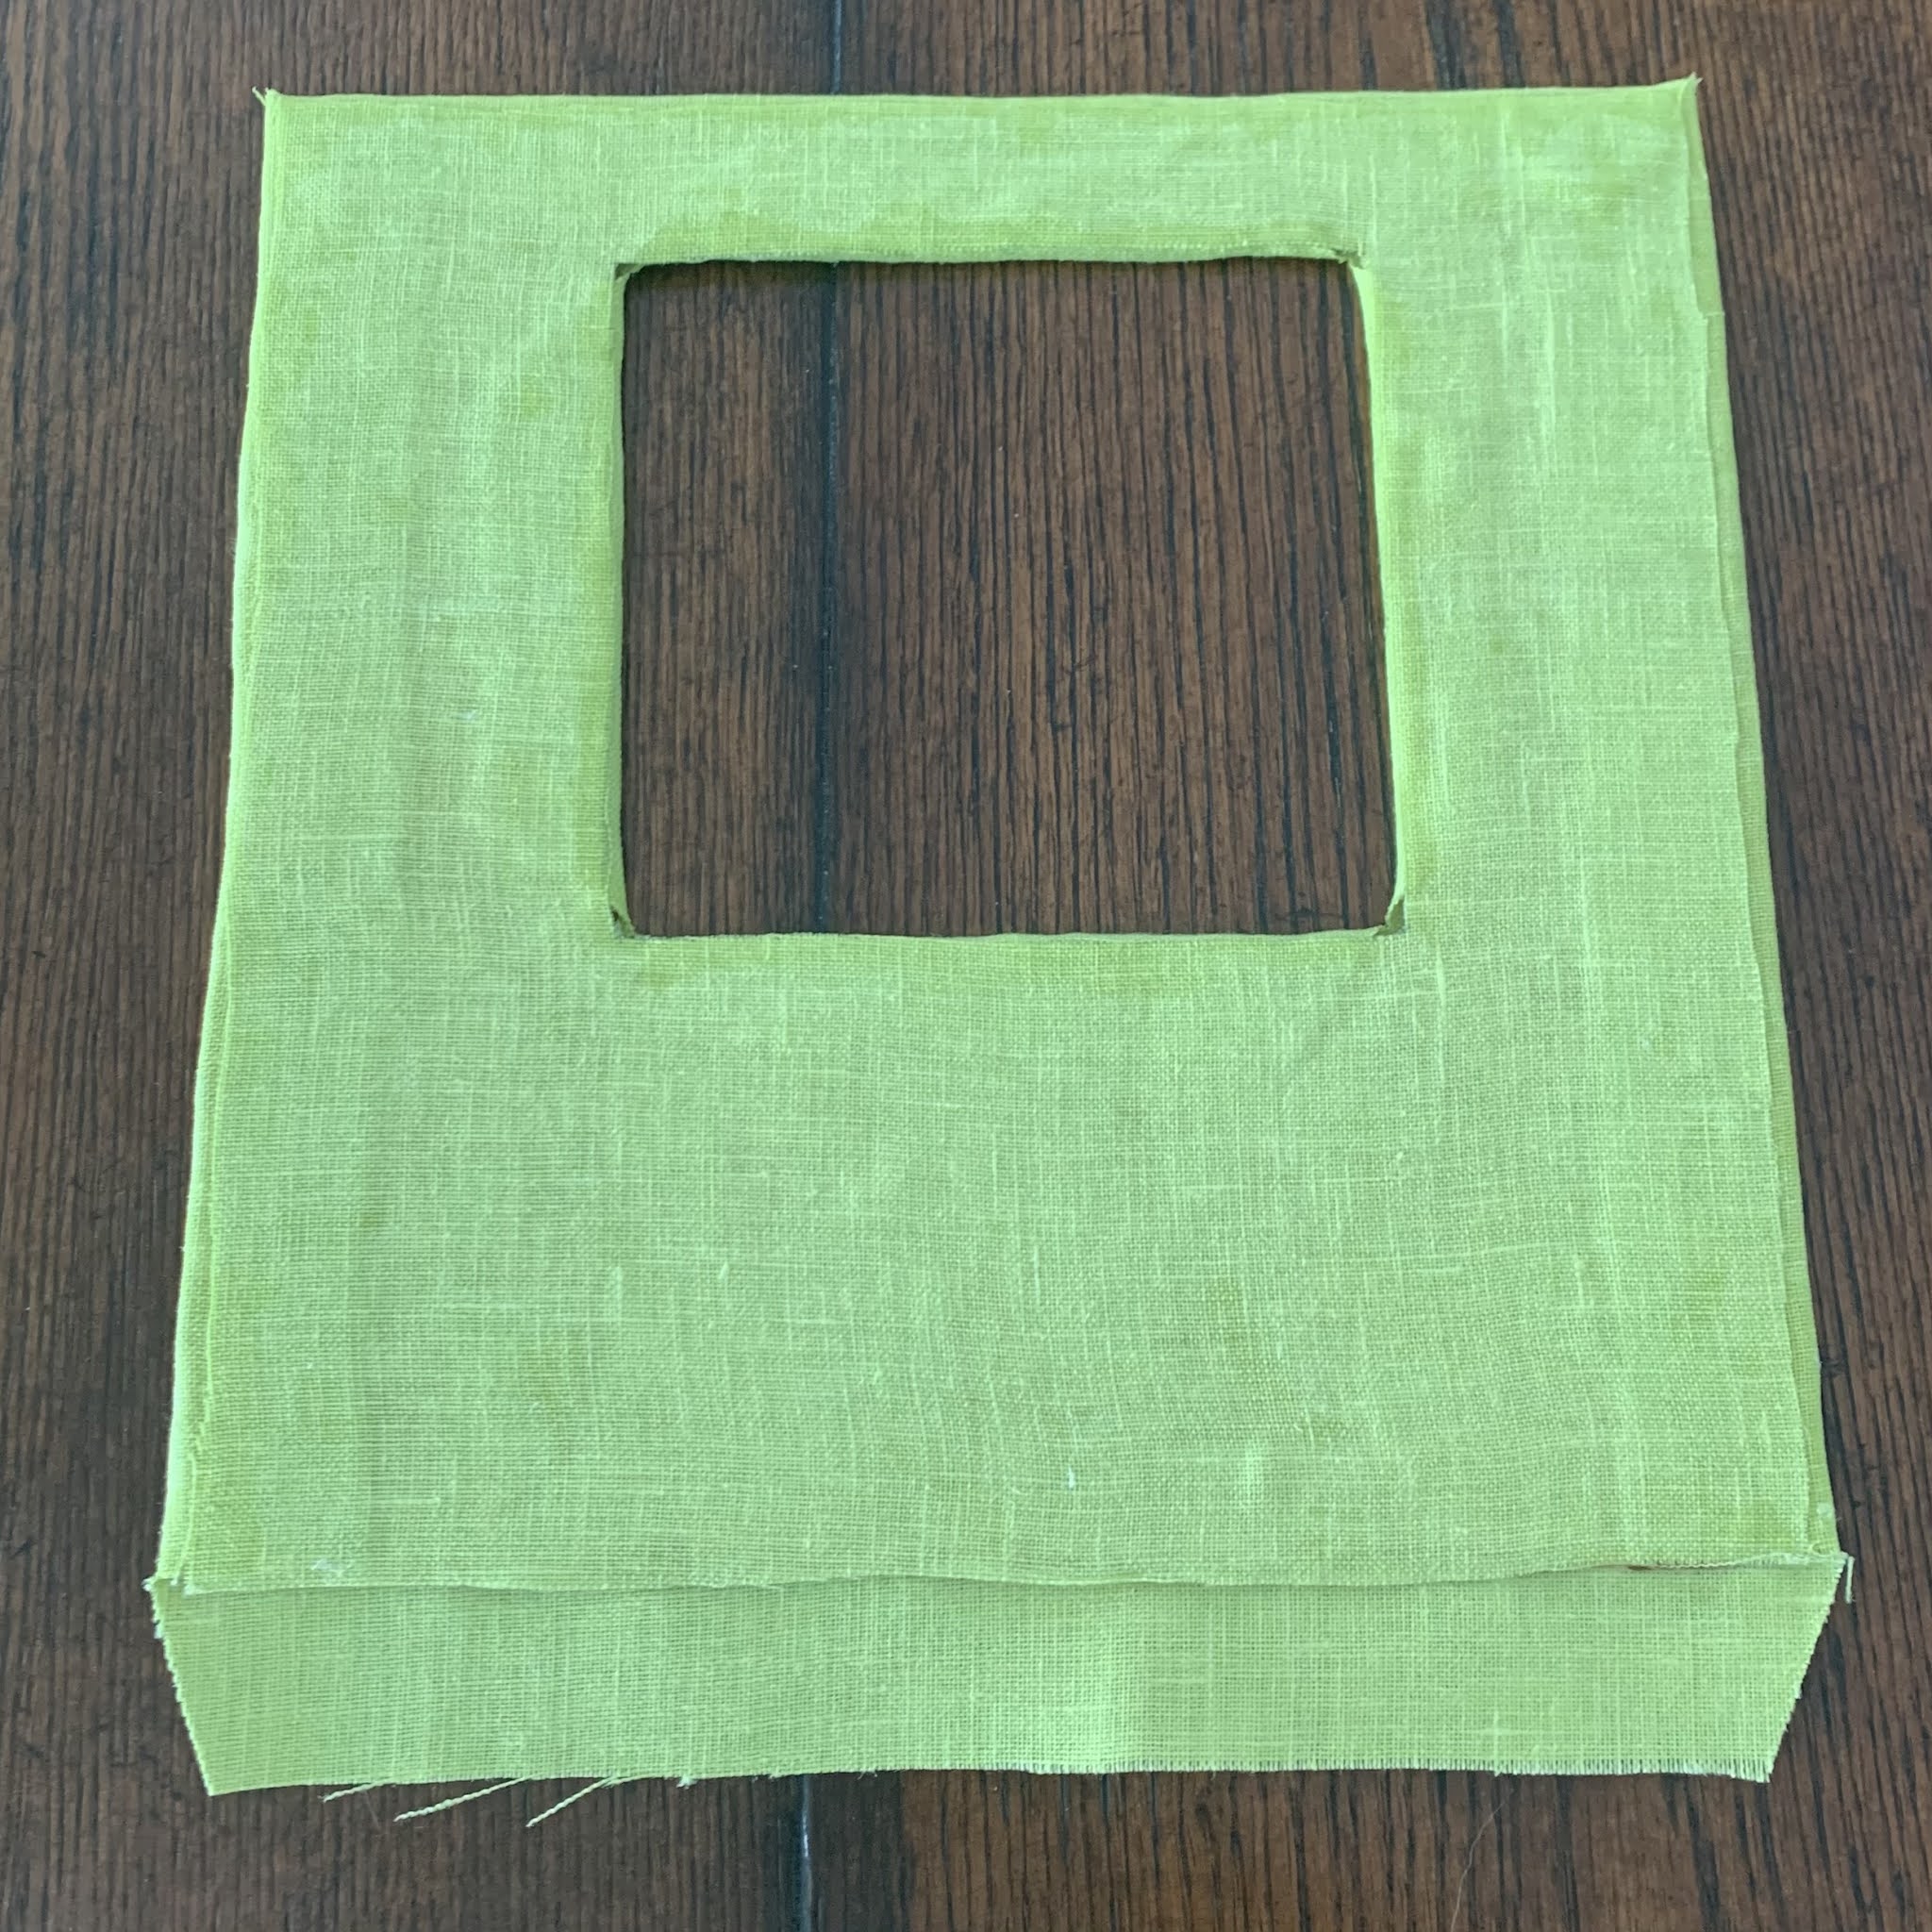
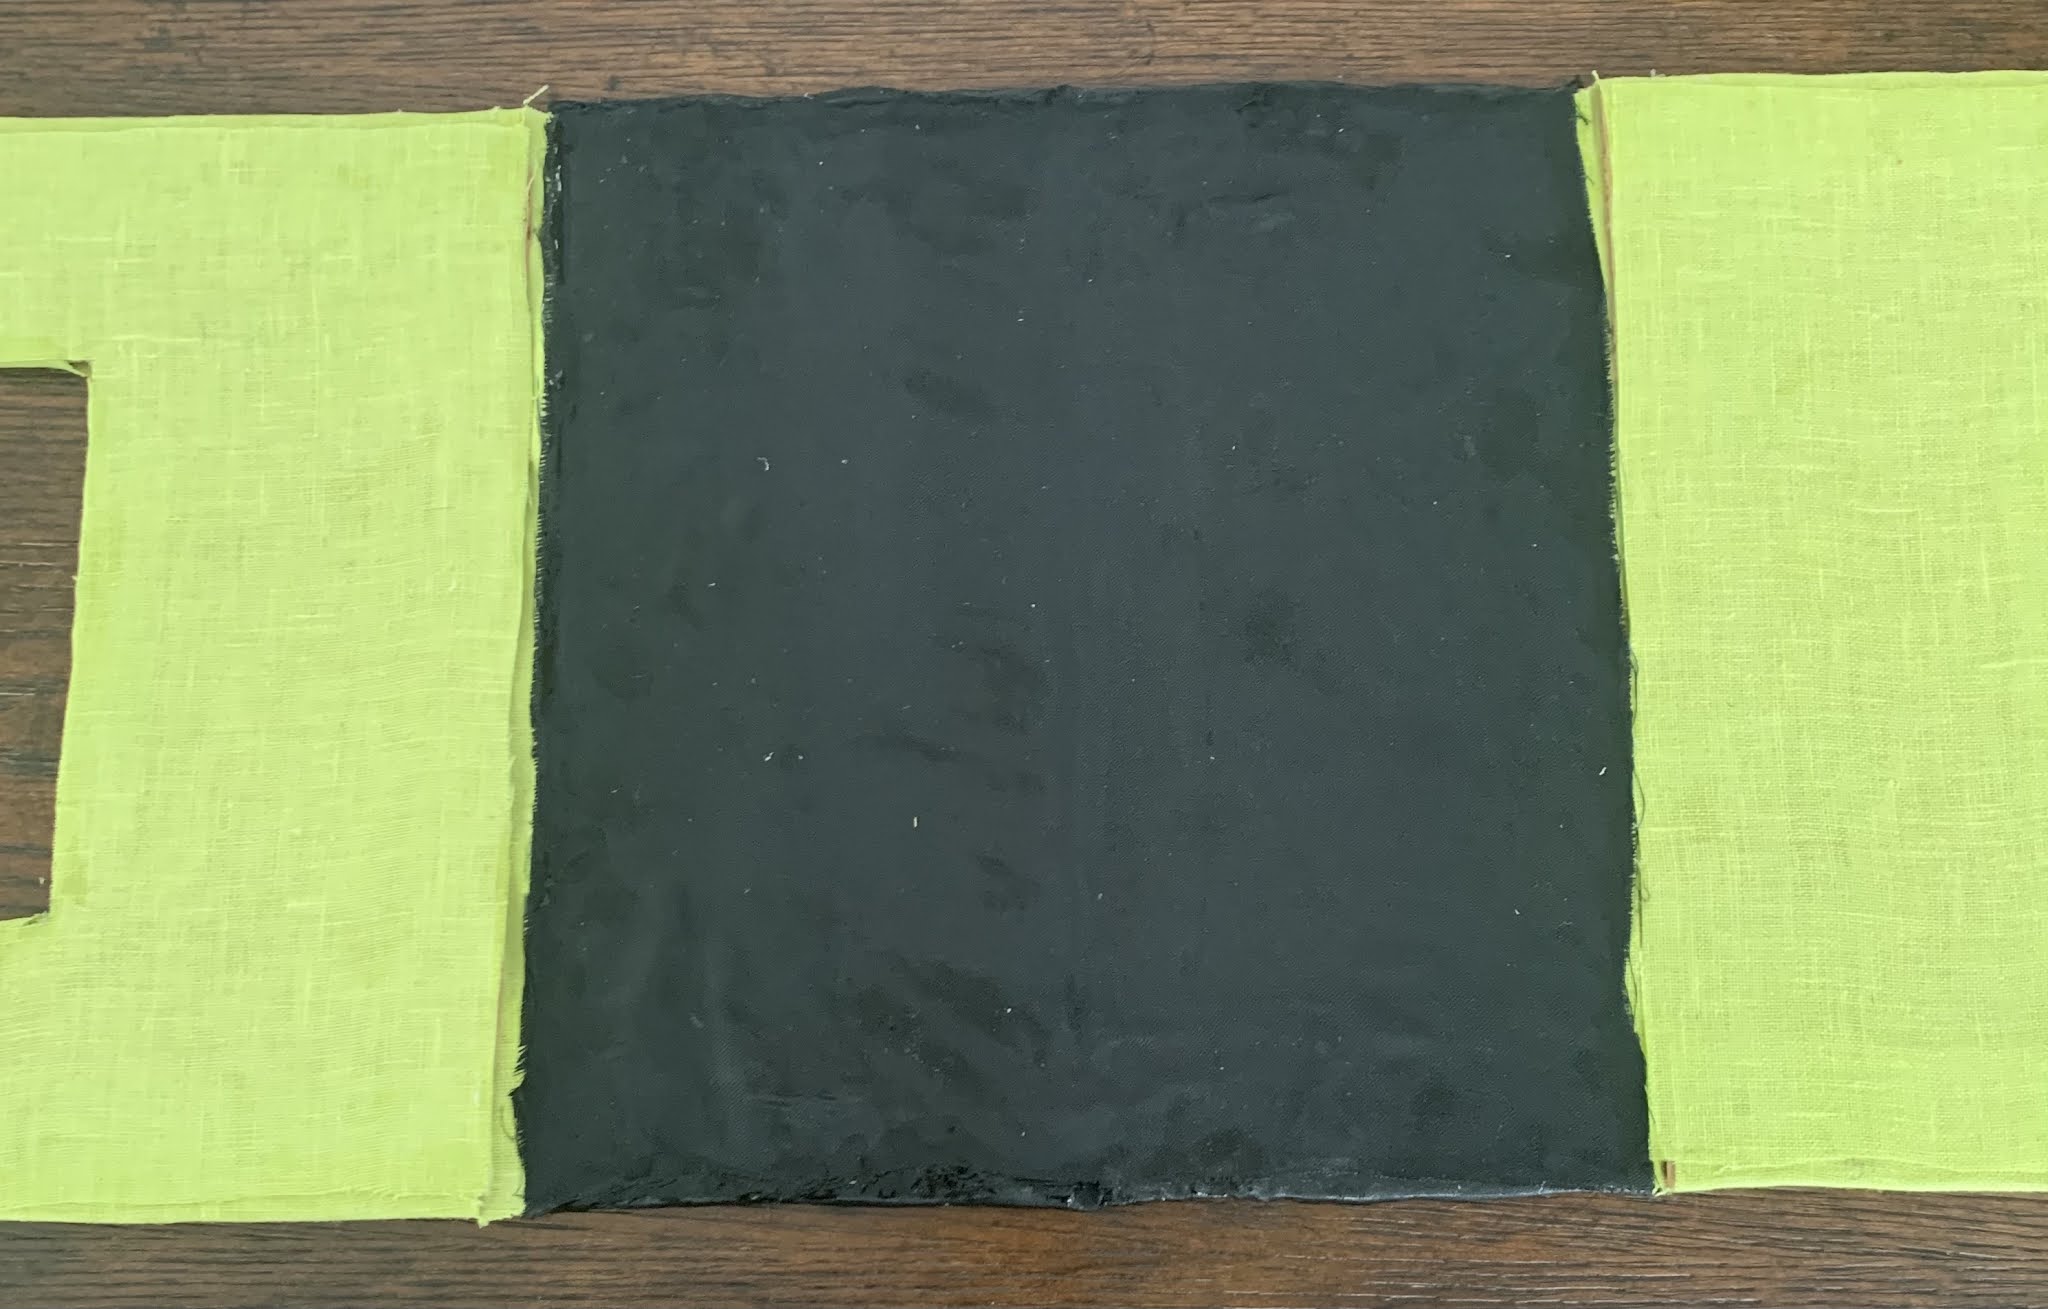
Step 2: Brush tacky glue evenly and on one entire side of the wall piece (cardboard with windows cut out). Lay the cardboard on the wrong-side of the fabric and press evenly to adhere the fabric to the cardboard. Smooth any bubbles. Cut around the cardboard and inside the window about 2.5cm on each side.
Step 3: Trim the fabric around as shown in the first pic. With the cardboard oriented as shown, brush tacky glue fully and evenly on all of the fabric exposed fabric tabs EXCEPT the bottom one. Fold these tabs in and press them evenly on the cardboard (second picture was taken mid-process. The clips I used at first, but found that the glue kept the fabric fine without them).


Step 4: Keeping exposed side of the cardboard up, brush tacky glue on the entire side up (including the folded over fabric on this side), but do not put glue on the remaining tab on the bottom. Lay the fabric that was cut to the same dimensions as the cardboard over this (wrong-side down), pressing it down evenly. Take some tacky glue, and apply it on top of these edges and tame the threads. It should dry in whatever position you brushed them in. Using your finger to do this may give you better control. Just wash your hands after. Don't worry about the fabric layers showing through the fabric. This is the inside of the tent.
Repeat Steps 1-4 again for the other wall.
Step 5: We are now going to work on the floor. Measure the cardboard thickness, and double it. Cut this measurement out of the center of the cardboard. This step allows the tent to be foldable. I can not give you measurements for this, as cardboard does not have a standard thickness, and it depends on what you personally used.

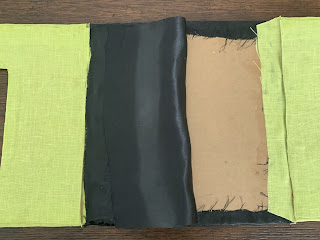
Step 6: Take ONE of the floor pieces of cardboard and brush tacky glue on one side; fully and evenly. Press it to the wrong side of the fabric.

Step 7: Flip so the cardboard is down and the right side of the fabric is up. Smooth out the fabric of bubbles and make sure all the fabric is pressed on evenly. Fold the fabric back evenly so the fabric's wrong-side is showing, and the fold line is at the cardboard's edge. It may help to let that dry some first to help it hold better for this step. Brush tacky glue evenly and fully on one side of the SECOND piece of cardboard. Place the second piece of cardboard on the wrong-side of the fabric, but directly on top of the first piece of cardboard (so fabric should be sandwiched between the cardboard pieces, and be folded), making sure the edges line up.

Step 8: Lay the floor with the fabric-side down and both cardboard pieces up. Trim the fabric around to be about 2.5 cm from the cardboard on all sides. Cut the corners of the fabric off at an angle just up to the cardboard corners. Brush tacky glue on all fabric tabs and fold them in to lay on the cardboard.

Step 9: With the exposed cardboard side of the floor still up and oriented as shown, brush a line of tacky glue (at least 3cm wide) on the edge of the left edge of the floor. Take one wall with the right-side up (side that looks more finished and does not have the folded tabs glued on it), fold the fabric tab under completely with your hands. Line up that edge of the wall to the floor's edge that has glue on it, and lay the wall down on top of the floor (shown in first pic). Press down lightly to the glued edge. That fabric tab is now a hinge, so carefully open the wall like a book. Now press the fabric tab that is glued down. Turn the whole thing 180 degrees and repeat the process for the other wall. The finished steps should look like the second pic.


Step 10: Brush half of the floor part (including fabric tabs on it) with tacky glue. Take the piece of floor fabric that is left (the one measured and cut in Step 1). Fold the fabric in half with the right-sides facing each other. Lay the fabric down on the glued part with the folded edge meeting at the center of the floor where the fold is. Don't worry too much about the edge meeting up to the wall; this is covered in the fold once the tent is assembled. Press the fabric down and smooth bubbles. Use tacky glue to tame frays.
Step 11: Keeping the tent oriented as shown above. Fold the floor with the fold up, then laid down to the left side (so the cardboard side is up, but the right piece of floor cardboard is now laying on top of the right piece of floor cardboard. Brush tacky glue on the exposed cardboard, as well as the remaining fabric tabs. Bring remaining fabric over and lay it on the glue while the floor is still folded. Again, don't worry about the side that meets the wall too much. Press evenly and smooth bubbles. Use the tacky glue to tame the frays. Now open (shown in pic all steps finished up to this point, but ignore how poorly I smoothed the fabric).
Step 12: Take a strip of ribbon (or whatever you are using), find the middle, and glue the middle to the edge of the wall (about 6cm from the floor). Repeat this three more times for the remaining sides.

Step 13: Now we make the doors. Use fray check on all edges of the triangle. Let dry. With the triangle wrong-side up and the strip wrong-side down, take strip and glue the edge of the strip to the diagonal of the fabric (as shown in the first picture), and trim the excess (as shown in the second photo). Repeat 3 more times for the rest of the doors. Let the tacky glue dry. It will help you in the next step.


Step 14: Fold the strip towards itself (right-side to right-side) the long way, but the fold lining up with the door's diagonal edge. The glue should have stiffened it up enough to help as a guide. Iron this so the fold is crisp. Repeat for the rest of the doors.


Step 15: Using a scrap piece of fabric or whatever works, tie up the walls together through the windows. (my pic doesn't show the ties/ribbon in place. Ignore that.)

Step 16: Brush tacky glue evenly on door strip's wrong-side. Do this for each door, putting them in place on the tent with their wrong-sides facing the inside of the tent, and with their diagonal edges going right in line with the wall's edge. Adjust as needed. Untie the fabric strip holding the tend through the windows and lay the tent flat again. Then use tacky glue to tame the edges of the door strips.
Step 17: Put Fray Check on all edges of the supporting strip and let dry. Fold it in half the long way and with right-sides facing each other. Iron this to a crisp edge (mine does not look so crisp from the pic I took, but it was).


Step 19: Fold another piece of ribbon in half, and glue it in the center of the window on the edge. Repeat on the other window.
Step 20: Take a window shade, use fray check on all edges, and let dry. Brush a line (about 1cm wide) of tacky glue on the top (the side that is 17cm) of the shade, but on the wrong-side of the fabric. Glue the edge of the shade about 2cm from the top of the tent wall, but centered from side to side over the window.
Step 21: With one set of doors facing you, take the ribbons (the one laying inside and the one outside) on one door, bring the together straight out towards you, and trim them to about 12.5cm from the tent. Repeat for remaining doors.
Step 22: Have the window facing you with the shade down. Hold inner ribbon and outer ribbon down side of wall. Trim them together at 17cm from top of window shade. Repeat for other window.
Folding
Let dry before attempting to fold and unfold the tent. Once dry, you can fold it with the doors inside, and use the door ribbons to tie each side shut.
Using
To keep the doors open, they can be rolled back and tied with its own inner and outer ribbons.
To close the doors shut or creating a "backside", I find it is easiest, and most stable is to criss-cross the ribbons when tying them. What I mean by that is to take one door's outside ribbon, tie it to the other door's inner ribbon, and vice-versa.
The window shades can be rolled up and tied with its own inner and outer ribbons.
You are done!
Let me know if you tried out this tutorial! Any feedback is helpful. I am available for questions and troubleshooting! Contact me through my nuiMOs Instagram or the Facebook group!
Instagram: @kawaii.nuimos
Facebook group: Disney nuiMOs Crafters
Comments
Post a Comment